> ## Documentation Index
> Fetch the complete documentation index at: https://docs.agentixhub.ai/llms.txt
> Use this file to discover all available pages before exploring further.
# Organization
> Configure your organization profile, branding and notification providers
Access your organization settings through the cPanel sidebar to configure your organization profile, branding assets and notification preferences.
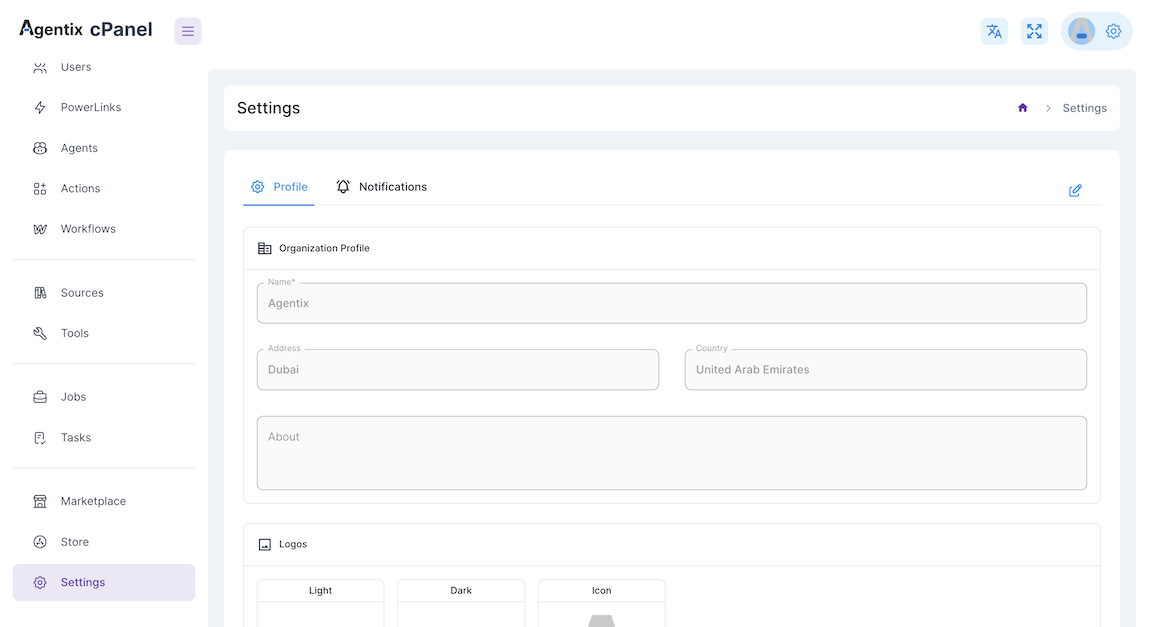 Organization Settings are accessible from the cPanel sidebar and contain profile and notification management options.
## Profile Settings
The Profile tab contains your organization's basic information and branding settings.
### Organization Profile
Configure your organization's essential details and contact information.
**Required Fields:**
* **Name** - Your organization's display name (e.g., "Agentix")
* **Address** - Physical business address (e.g., "Dubai")
* **Country** - Your organization's primary country (e.g., "United Arab Emirates")
* **About** - Description of your organization and business focus
Upload your organization's branding assets for consistent visual identity.
**Logo Requirements:**
* **Light Logo** - For light theme backgrounds (PNG/SVG recommended)
* **Dark Logo** - For dark theme backgrounds (PNG/SVG recommended)
* **Icon** - Square icon for compact displays (PNG/SVG, 1:1 aspect ratio)
**Specifications:**
* Maximum file size: 300kb per image
* Supported formats: PNG, SVG, JPG
* Recommended dimensions: 200x50px for logos, 64x64px for icons
### Profile Configuration
Fill in your organization name, address and country information in the respective fields.
Provide a brief description of your organization in the "About" section to help users understand your business.
Upload your light logo, dark logo and icon to maintain consistent branding across the platform.
Click the save button to apply your organization profile updates.
## Notifications Settings
The Notifications tab allows you to configure the communication providers that will be used to send notifications and alerts from your organization.
### Provider Configuration
Configure the communication providers that will handle different types of notifications from your Agentix organization.
Configure your email server settings for sending email notifications.
**Configuration Fields:**
* **Provider Dropdown** - Select email provider (Gmail, SMTP Server, etc.)
* **Username** - Email address for authentication (e.g., "[slinkxy.notifications@gmail.com](mailto:slinkxy.notifications@gmail.com)")
* **SMTP Server** - Server hostname for email delivery
* **Password** - Authentication password for the email account
* **SMTP Port** - Port number for SMTP connection (typically 587 or 465)
**Setup Instructions:**
1. Select your email provider from the dropdown menu
2. Enter your email username/address
3. Configure SMTP server settings
4. Provide the authentication password
5. Set the appropriate SMTP port
6. Test the connection to verify settings
Configure your SMS service provider for sending text message notifications.
**Configuration Fields:**
* **SMS Provider Dropdown** - Select SMS service (SMS Global, Twilio, etc.)
* **API Key** - Your SMS provider's API authentication key
* **API Secret** - Secret key for API authentication
* **API URL** - SMS provider's API endpoint URL
* **Auth Token** - Additional authentication token if required
**Setup Instructions:**
1. Choose your SMS provider from the dropdown
2. Enter your API key from your SMS provider account
3. Add the API secret for authentication
4. Configure the API URL endpoint
5. Provide auth token if required by your provider
6. Test SMS delivery to verify configuration
Configure WhatsApp Business API for sending WhatsApp notifications.
**Configuration Fields:**
* **API URL** - WhatsApp Business API endpoint (e.g., "[https://api.novomind-messaging.com/api/v1/](https://api.novomind-messaging.com/api/v1/)")
* **Auth Token** - Authentication token for WhatsApp Business API access
**Setup Instructions:**
1. Obtain WhatsApp Business API access
2. Enter the API URL provided by your WhatsApp provider
3. Add your authentication token
4. Verify API connection
5. Test WhatsApp message delivery
**Requirements:**
* WhatsApp Business API account
* Verified business profile
* Approved message templates
### Provider Setup Steps
Choose which providers you want to configure: Email Server, SMS Provider and/or WhatsApp Provider.
Fill in the required authentication details for each selected provider.
Set up server URLs, ports and other technical configuration parameters.
Verify that each provider is properly configured by sending test messages.
Click the "Save" button to apply your notification provider settings.
### Testing Your Configuration
Send a test email to verify your email server configuration is working correctly.
Send a test SMS message to confirm your SMS provider setup is functional.
Send a test WhatsApp message to validate your WhatsApp provider configuration.
Make sure to test each provider configuration before relying on them for critical notifications. Invalid configurations may result in failed message delivery.
### Notification Delivery
Once your providers are configured, they will be used to send different types of notifications:
System alerts, reports and account notifications delivered via your configured email server.
Critical alerts and urgent notifications sent via your SMS provider.
Business communications and customer notifications through WhatsApp Business API.
After configuring your notification providers, use the "Discard Changes" button to cancel unsaved changes or "Save" to apply your new settings.
***
## Access Organization Settings
To access your organization settings in the cPanel:
1. **Navigate to Settings** - Click the "Settings" option in the left sidebar of your cPanel
2. **Choose Tab** - Select either "Profile" or "Notifications" tab at the top
3. **Configure Settings** - Update your organization information or notification providers
4. **Save Changes** - Apply your settings by clicking the "Save" button
Organization settings changes are applied immediately and affect all users in your organization.
***
Need help with organization configuration? Check out our [User Management Guide](/user-guide/getting-started/roles-and-access) or contact support for assistance.
Organization Settings are accessible from the cPanel sidebar and contain profile and notification management options.
## Profile Settings
The Profile tab contains your organization's basic information and branding settings.
### Organization Profile
Configure your organization's essential details and contact information.
**Required Fields:**
* **Name** - Your organization's display name (e.g., "Agentix")
* **Address** - Physical business address (e.g., "Dubai")
* **Country** - Your organization's primary country (e.g., "United Arab Emirates")
* **About** - Description of your organization and business focus
Upload your organization's branding assets for consistent visual identity.
**Logo Requirements:**
* **Light Logo** - For light theme backgrounds (PNG/SVG recommended)
* **Dark Logo** - For dark theme backgrounds (PNG/SVG recommended)
* **Icon** - Square icon for compact displays (PNG/SVG, 1:1 aspect ratio)
**Specifications:**
* Maximum file size: 300kb per image
* Supported formats: PNG, SVG, JPG
* Recommended dimensions: 200x50px for logos, 64x64px for icons
### Profile Configuration
Fill in your organization name, address and country information in the respective fields.
Provide a brief description of your organization in the "About" section to help users understand your business.
Upload your light logo, dark logo and icon to maintain consistent branding across the platform.
Click the save button to apply your organization profile updates.
## Notifications Settings
The Notifications tab allows you to configure the communication providers that will be used to send notifications and alerts from your organization.
### Provider Configuration
Configure the communication providers that will handle different types of notifications from your Agentix organization.
Configure your email server settings for sending email notifications.
**Configuration Fields:**
* **Provider Dropdown** - Select email provider (Gmail, SMTP Server, etc.)
* **Username** - Email address for authentication (e.g., "[slinkxy.notifications@gmail.com](mailto:slinkxy.notifications@gmail.com)")
* **SMTP Server** - Server hostname for email delivery
* **Password** - Authentication password for the email account
* **SMTP Port** - Port number for SMTP connection (typically 587 or 465)
**Setup Instructions:**
1. Select your email provider from the dropdown menu
2. Enter your email username/address
3. Configure SMTP server settings
4. Provide the authentication password
5. Set the appropriate SMTP port
6. Test the connection to verify settings
Configure your SMS service provider for sending text message notifications.
**Configuration Fields:**
* **SMS Provider Dropdown** - Select SMS service (SMS Global, Twilio, etc.)
* **API Key** - Your SMS provider's API authentication key
* **API Secret** - Secret key for API authentication
* **API URL** - SMS provider's API endpoint URL
* **Auth Token** - Additional authentication token if required
**Setup Instructions:**
1. Choose your SMS provider from the dropdown
2. Enter your API key from your SMS provider account
3. Add the API secret for authentication
4. Configure the API URL endpoint
5. Provide auth token if required by your provider
6. Test SMS delivery to verify configuration
Configure WhatsApp Business API for sending WhatsApp notifications.
**Configuration Fields:**
* **API URL** - WhatsApp Business API endpoint (e.g., "[https://api.novomind-messaging.com/api/v1/](https://api.novomind-messaging.com/api/v1/)")
* **Auth Token** - Authentication token for WhatsApp Business API access
**Setup Instructions:**
1. Obtain WhatsApp Business API access
2. Enter the API URL provided by your WhatsApp provider
3. Add your authentication token
4. Verify API connection
5. Test WhatsApp message delivery
**Requirements:**
* WhatsApp Business API account
* Verified business profile
* Approved message templates
### Provider Setup Steps
Choose which providers you want to configure: Email Server, SMS Provider and/or WhatsApp Provider.
Fill in the required authentication details for each selected provider.
Set up server URLs, ports and other technical configuration parameters.
Verify that each provider is properly configured by sending test messages.
Click the "Save" button to apply your notification provider settings.
### Testing Your Configuration
Send a test email to verify your email server configuration is working correctly.
Send a test SMS message to confirm your SMS provider setup is functional.
Send a test WhatsApp message to validate your WhatsApp provider configuration.
Make sure to test each provider configuration before relying on them for critical notifications. Invalid configurations may result in failed message delivery.
### Notification Delivery
Once your providers are configured, they will be used to send different types of notifications:
System alerts, reports and account notifications delivered via your configured email server.
Critical alerts and urgent notifications sent via your SMS provider.
Business communications and customer notifications through WhatsApp Business API.
After configuring your notification providers, use the "Discard Changes" button to cancel unsaved changes or "Save" to apply your new settings.
***
## Access Organization Settings
To access your organization settings in the cPanel:
1. **Navigate to Settings** - Click the "Settings" option in the left sidebar of your cPanel
2. **Choose Tab** - Select either "Profile" or "Notifications" tab at the top
3. **Configure Settings** - Update your organization information or notification providers
4. **Save Changes** - Apply your settings by clicking the "Save" button
Organization settings changes are applied immediately and affect all users in your organization.
***
Need help with organization configuration? Check out our [User Management Guide](/user-guide/getting-started/roles-and-access) or contact support for assistance.