> ## Documentation Index
> Fetch the complete documentation index at: https://docs.agentixhub.ai/llms.txt
> Use this file to discover all available pages before exploring further.
# Jobs
> Track and manage all jobs initiated through workflows in Agentix.
The **Jobs** page provides a detailed view of every job that has been created on the platform. Jobs are generated when a workflow is triggered and they serve as containers for one or more tasks.
 ***
## Jobs List Overview
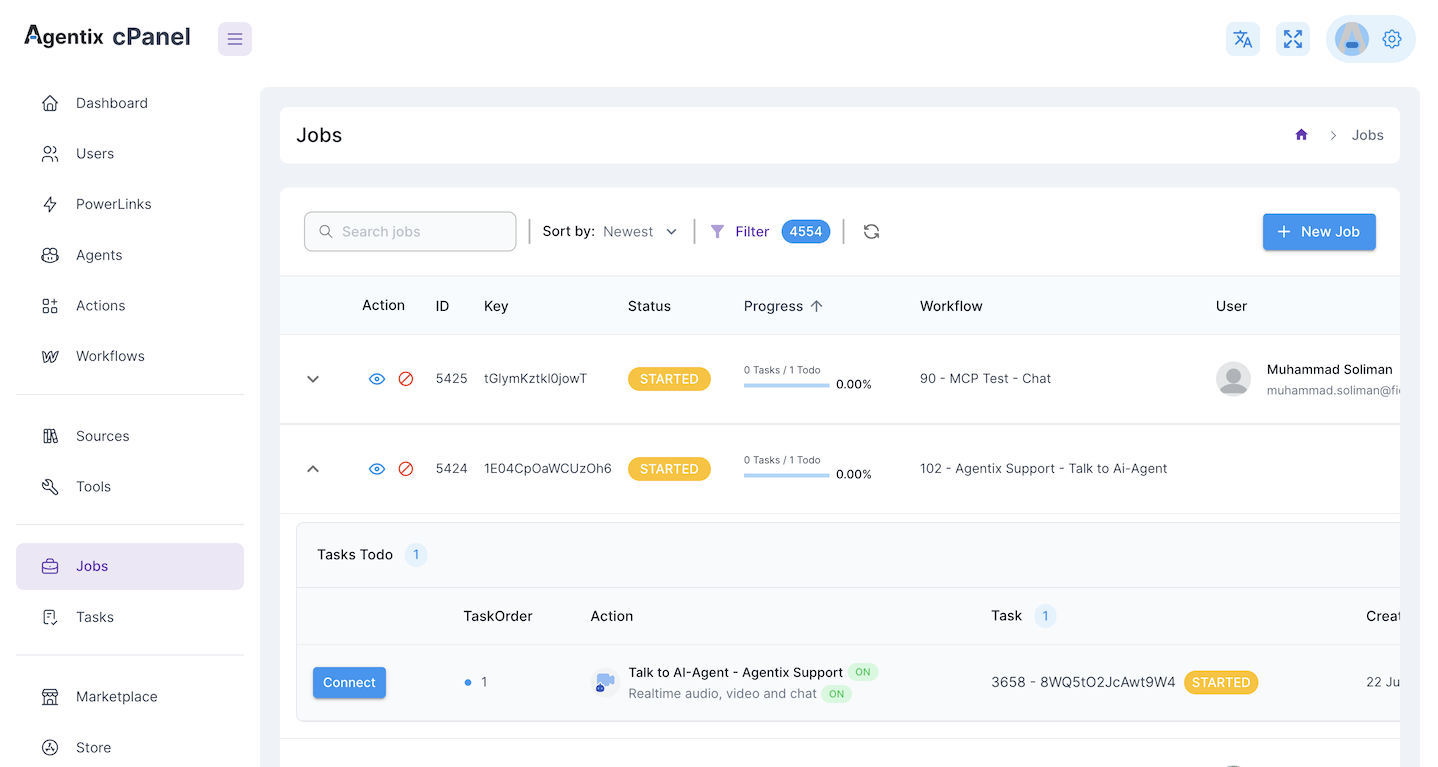
Each row in the table represents a job instance and includes:
* 👁️ **Action**: View job or cancel it.
* 🆔 **ID / Key**: Unique identifiers for tracking.
* 🟡 **Status**: Current state (e.g. `STARTED`, `DONE`, `REJECTED`).
* 📈 **Progress**: How many tasks are completed versus pending.
* 🔄 **Workflow**: The workflow that initiated the job.
* 👤 **User**: The user or entity associated with the job.
You can **sort**, **search** and **filter** jobs easily using the top controls.
***
## Expanding a Job
Click the arrow icon (▾) next to a job to expand its **task list**.
* The "Tasks Todo" panel shows the pending or active tasks.
* You can see task order, assigned actions, task IDs and statuses.
* If real-time tasks are enabled (e.g., `Talk to AI-Agent`), you can **Connect** directly from here.
Once a job is created, clicking on it opens a detailed view to inspect its current state, metadata and full history.
***
## Jobs List Overview
Each row in the table represents a job instance and includes:
* 👁️ **Action**: View job or cancel it.
* 🆔 **ID / Key**: Unique identifiers for tracking.
* 🟡 **Status**: Current state (e.g. `STARTED`, `DONE`, `REJECTED`).
* 📈 **Progress**: How many tasks are completed versus pending.
* 🔄 **Workflow**: The workflow that initiated the job.
* 👤 **User**: The user or entity associated with the job.
You can **sort**, **search** and **filter** jobs easily using the top controls.
***
## Expanding a Job
Click the arrow icon (▾) next to a job to expand its **task list**.
* The "Tasks Todo" panel shows the pending or active tasks.
* You can see task order, assigned actions, task IDs and statuses.
* If real-time tasks are enabled (e.g., `Talk to AI-Agent`), you can **Connect** directly from here.
Once a job is created, clicking on it opens a detailed view to inspect its current state, metadata and full history.
 ### 🧾 Header Summary
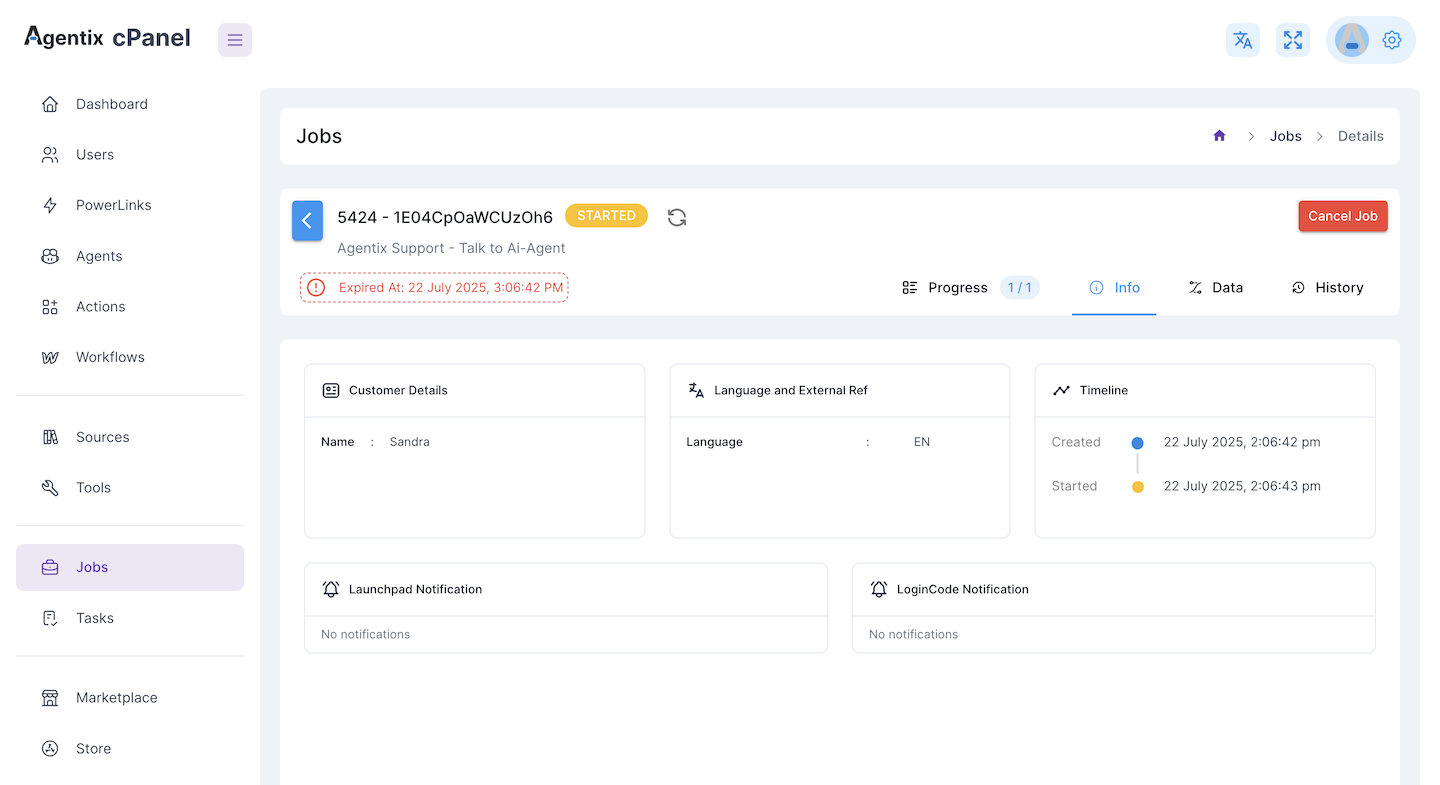
* **Job ID & Key**: Uniquely identifies the job instance.
* **Status**: Indicates if the job is `STARTED`, `DONE`, `CANCELED` or `REJECTED`.
* **Expiration Warning**: If the job has passed its validity period, a red notice appears.
### 📂 Tabs Explained
The view includes multiple tabs to inspect various aspects of the job:
#### 1. **Progress**
Shows task completion progress. Example: `1 / 1` means one task expected, one completed.
#### 2. **Info**
Displays:
* **Customer Details**: Name and basic metadata.
* **Language and External Reference**: Shows language used during the job (e.g., `EN`).
* **Timeline**: Shows `Created` and `Started` timestamps.
* **Notifications**: Launchpad and LoginCode alerts (if triggered during the job).
#### 3. **Data**
Used to inspect runtime input/output data and system config related to the job. This includes transcripts, LLM usage and job-wide metadata.
#### 4. **History**
Chronological record of all major events (e.g., job creation, status changes, cancellations).
> The Job Details page is your primary source of truth for understanding what happened in a job — from start to end, including the customer, actions, tools and decisions taken by the system or agent.
## Job Status Types
Jobs can be in one of several statuses:
* `NEW`: Created but not started yet.
* `STARTED`: Actively running.
* `DONE`: Successfully completed.
* `CANCELED`: Stopped manually or by rule.
* `REJECTED`: Rejected by an agent or validation logic.
You can track these on the **Dashboard** for trend monitoring.
***
## ➕ Creating a New Job
Click the **+ New Job** button on the top-right of the Jobs page to launch a job manually.
### 🧾 Header Summary
* **Job ID & Key**: Uniquely identifies the job instance.
* **Status**: Indicates if the job is `STARTED`, `DONE`, `CANCELED` or `REJECTED`.
* **Expiration Warning**: If the job has passed its validity period, a red notice appears.
### 📂 Tabs Explained
The view includes multiple tabs to inspect various aspects of the job:
#### 1. **Progress**
Shows task completion progress. Example: `1 / 1` means one task expected, one completed.
#### 2. **Info**
Displays:
* **Customer Details**: Name and basic metadata.
* **Language and External Reference**: Shows language used during the job (e.g., `EN`).
* **Timeline**: Shows `Created` and `Started` timestamps.
* **Notifications**: Launchpad and LoginCode alerts (if triggered during the job).
#### 3. **Data**
Used to inspect runtime input/output data and system config related to the job. This includes transcripts, LLM usage and job-wide metadata.
#### 4. **History**
Chronological record of all major events (e.g., job creation, status changes, cancellations).
> The Job Details page is your primary source of truth for understanding what happened in a job — from start to end, including the customer, actions, tools and decisions taken by the system or agent.
## Job Status Types
Jobs can be in one of several statuses:
* `NEW`: Created but not started yet.
* `STARTED`: Actively running.
* `DONE`: Successfully completed.
* `CANCELED`: Stopped manually or by rule.
* `REJECTED`: Rejected by an agent or validation logic.
You can track these on the **Dashboard** for trend monitoring.
***
## ➕ Creating a New Job
Click the **+ New Job** button on the top-right of the Jobs page to launch a job manually.
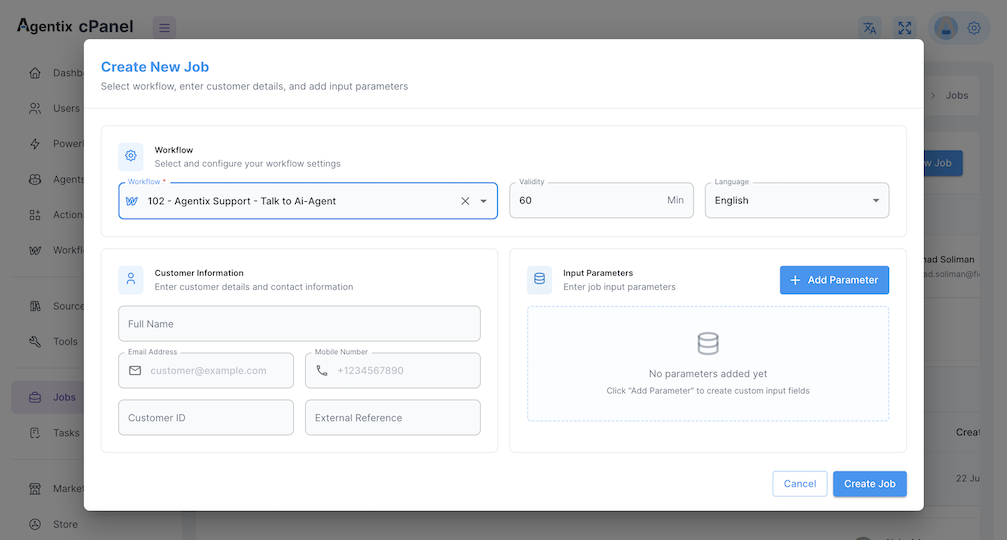 This will open a form where you can define the following:
Pick a predefined **Workflow** from the dropdown. Each workflow controls:
* What the job does
* What tasks are triggered
* Which agents or tools are used
Set the **validity duration** (in minutes) and the **preferred language** of interaction.
Provide basic contact information for the customer:
* Full name
* Email address
* Mobile number
* Optional: `Customer ID` or `External Reference` for traceability
If the workflow expects inputs (e.g., user ID, issue type, plan code):
* Click **Add Parameter**
* Enter key-value pairs that will be available to the agent and tools
These parameters can also affect workflow branching or agent behavior.
After filling the required fields:
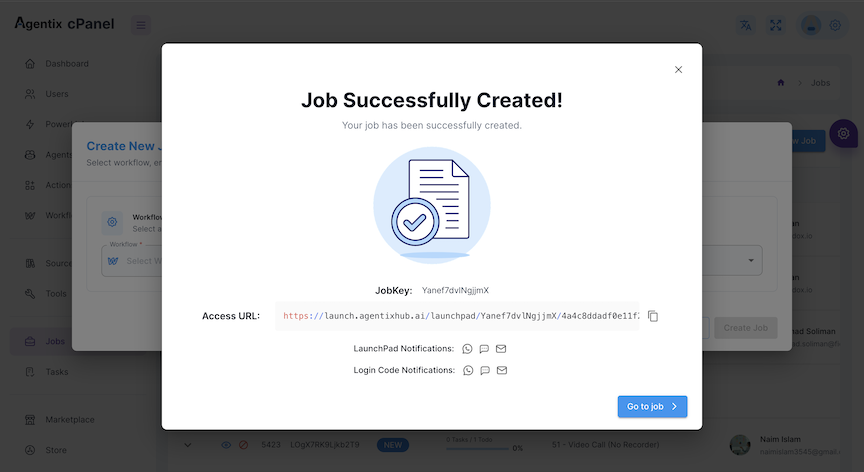
* Click **Create Job**
* The new job will appear in the Jobs list
* Progress starts automatically based on how tasks are defined in the workflow
This will open a form where you can define the following:
Pick a predefined **Workflow** from the dropdown. Each workflow controls:
* What the job does
* What tasks are triggered
* Which agents or tools are used
Set the **validity duration** (in minutes) and the **preferred language** of interaction.
Provide basic contact information for the customer:
* Full name
* Email address
* Mobile number
* Optional: `Customer ID` or `External Reference` for traceability
If the workflow expects inputs (e.g., user ID, issue type, plan code):
* Click **Add Parameter**
* Enter key-value pairs that will be available to the agent and tools
These parameters can also affect workflow branching or agent behavior.
After filling the required fields:
* Click **Create Job**
* The new job will appear in the Jobs list
* Progress starts automatically based on how tasks are defined in the workflow
 ## 💡 Tip
Filter by workflow or user to investigate problems quickly. If a job has failed or stalled, expand it to inspect task logs and assignments.
## 💡 Tip
Filter by workflow or user to investigate problems quickly. If a job has failed or stalled, expand it to inspect task logs and assignments.